 Click to enlarge Click to enlarge
|
Description
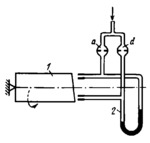
Squareness of the end face of work 1 to its axis is checked by using differential manometer 2. Compressed air is delivered through restrictors a and d to the gauging nozzles of the measuring heads. For each position of work 1, the clearances between its end face and the nozzles determine the heights of the mercury columns in the two branches of differential manometer 2. If the end face is square to the axis of the work, the mercury levels in the two branches of the manometer will be the same when the work is slowly rotated.
$3706$SHP,M$
|

 Click to enlarge


